Share
Pin
Tweet
Send
Share
Send
Consider the types of float valves, as well as methods for identifying and troubleshooting.
Types of float stop valves
Depending on the working body, the valves are divided into membrane and plunger (with lower or upper arrangement).
The diaphragm valve consists of a threaded tube, water enters the tank. Control over the flow of water into the system is carried out by a membrane.
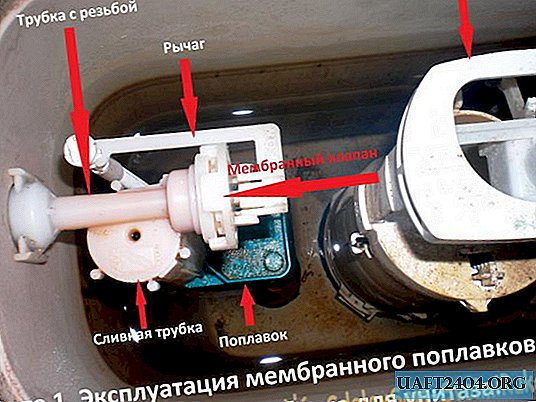
It blocks the outlet through the lever and the float. The float may also not have a lever, but move along the guides of the drain tube body. This design reduces the area of the valve and is mounted in small tanks. For example, in toilet bowls.
The plunger locking mechanism consists of a pipe with an inch thread on one edge, and on the other there is a small hole and a hollow cylinder along which the plunger moves (a piston with an end face of the seal). The movement of the piston in the direction of opening or closing occurs through a metal, plastic lever and a float.

Compared to diaphragm valves, plunger valves are easier to repair and maintain due to the design of sealing rubber.
Algorithm for identifying and troubleshooting a float device
The first sign of a valve malfunction is the constant flow of water into the toilet or pouring it out of the tank. It can have an explicit (easy to notice) or hidden (difficult to identify) character.
To determine the place of leakage, when the tank is full, open the top cover and examine the mechanisms of the tank. If water leaks from the float switch device, you must:
1. Shut off the water supply and lower the level below the valve mounting hole. The fluid can be drained with a rubber hose and capillary effect. In the toilet tank, just press the button or the water release lever.
2. Unscrew the water supply hose, the clamping nut of the valve and remove it from the tank.
3. In valves with a lever, to remove the sealing body, it is necessary to remove the rod, which is bolted or split. If the float moves in the guides, unfasten the latch from the float rod.
4. To dismantle the membrane, it is necessary to remove the stop, and in the plunger mechanism, the stem.
5. Examine the condition of the rubber and the outlet. If dirt is present, clean. Defective parts should be replaced.

6. Reassemble and install the valve in the reverse order.
7. Check the operation and tightness of the device.
Noise reduction in water when filling the tank
To reduce the noise when filling the tank with water, you can use a silencer. It is made of silicone or PVC tube. It should be 2 cm less than the height from the valve to the bottom of the tank, with the same diameter as the valve outlet.
A muffler of the right size is pulled onto the pipe and fixed with a crimp clamp. Noise reduction occurs as a result of the flow of fluid under a water shutter.
Also, noise can be reduced by reducing the pressure of the water supplied to the tank (the intensity of the water hammer will decrease).
Float valve selection
The valve for the tank is selected depending on the pressure of the liquid in the water supply system. Up to 1 bar a mechanism is used for low pressure, 1 - 3 bar - medium pressure and from 3 bar - high. With the wrong choice, a long or excessively fast filling of the tank occurs, which is accompanied by increased noise.
Share
Pin
Tweet
Send
Share
Send

